This article is intended for administrators.
Users have role-based permissions
- Setting access permissions for users is done through roles, and only an administrator can change permissions for users.
- As an administrator, you set permissions on a role and then assign that role to one or more users. Each user must be assigned at least one role to be able to see Organizers and other applications in their workspace. If no role is assigned, they will only see tasks.
- You assign a role to a user when you create the user, and you can change the assignment at any later time. That is, you can remove the role, replace the role, or assign a different role to the user. Once you make the change, the user's permissions to access Organizers change. Each user can have one or more roles.
How to manage setting for office users
- Go to Administration
- Select "Users" from the menu
- Follow instructions below
- Save the settings
You can set what the user can see using the role
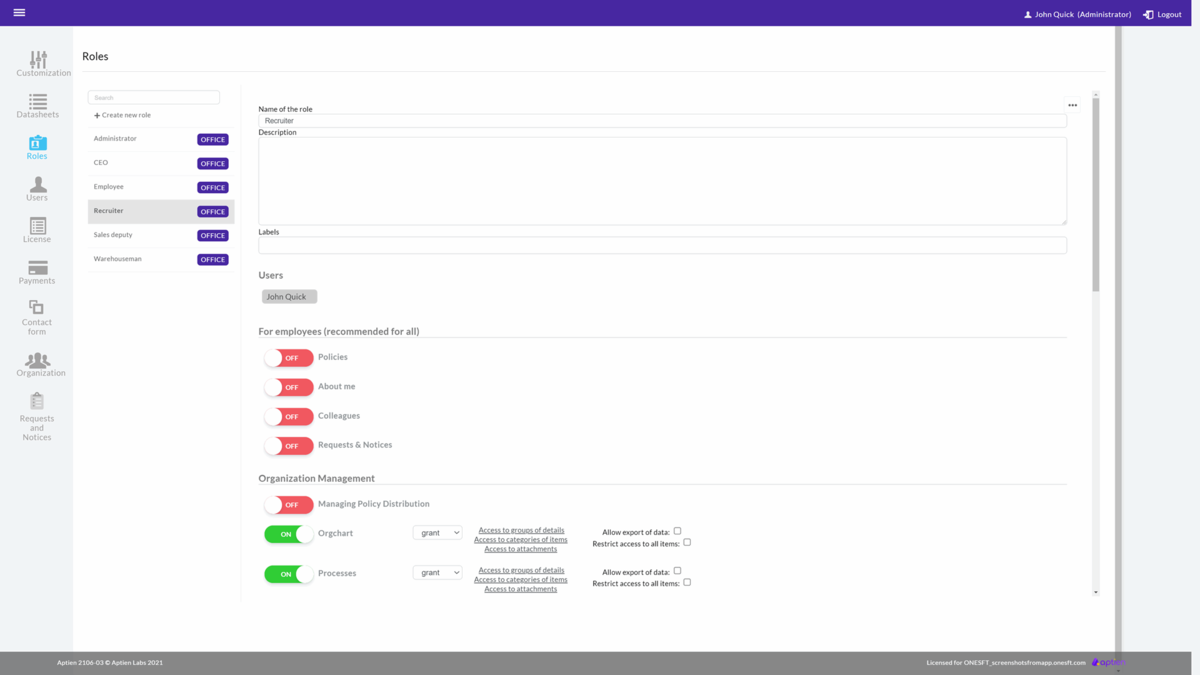
You set what the user can see and do with the role. That is, what all Organizers or applications the user can see and do in them. The settings are divided into blocks.
- For employees, it contains settings for access to common applications. It is usual and recommended to give everyone access to these parts of the system. Only in exceptional cases do you not give access here
- Backoffice management - here are various administrative tools for management and setup, such as Policy Management Administration
- HR - contains Organizers and tools designed or recommended for HR managers. They contain or are closely related to personal data
- Other Organizers - here, you set up access to your other Organizers
How to create a user role
- Using user roles, you can control your employees' access to individual Organizers and further restrict or extend their ability to work with Aptien.
- You can always access the role administration at the top of your screen under the "Administration" button. You can only enter here as an administrator.
- In the administration, select the "Roles" tab in the left menu. The role management options will then expand, where you will see an overview of the roles you have already created and the "+ New Role" button. You can then assign the created roles to individual users.
- Select the "+ New Role" button. Enter a name for the role, a description of the role, which is used for your reference so you can get a better idea of what each role means if you have more than one. Then set the role permissions for each Organizer and save. You can change the role settings at any time. Any changes to the role permission settings will immediately be reflected to all users working under that role.
Setting user access to individual Organizers
At the Organizer access level, the administrator prohibits or allows the user access to the entire Organizer. If access is disabled, the user will not be able to view the Organizer at all and thus will not be able to access its data. You can set access at several levels to control the range of functions that a given user can perform on the Organizer. Access to an Organizer must be enabled at least at the read level if the user is to create links (connections) from the Organizer to its contents.
The levels of access permission settings at the level of the entire Organizer are as follows:
- (OFF) --- no access - the user will not see this Organizer at all in the list of Organizers
- read - the user can see the Organizer, but the data (detail values) are read-only
- update - the user can edit existing entries (names, detail values) but can no longer create or delete entries
- create - the user can create additional items but cannot delete them
- delete - the user can both create and delete items
- grant - the user can set permissions to individual items for other users
These access levels always grow from the previous levels, i.e., they contain lower-level permissions. This means that if a given role is set to create access, it means that it can read, edit and create new items. If the level is delete, it will be able to read, edit, create and delete items.
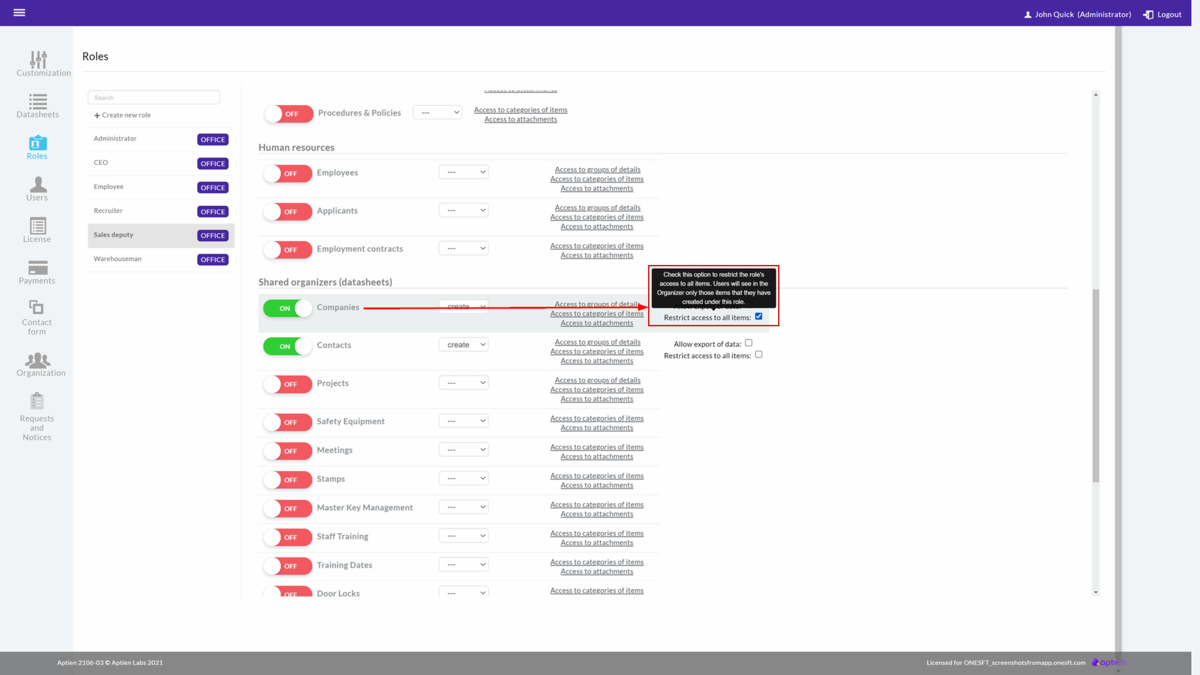
- A role that has access set to "create" and above and the "Restrict access to all items" box checked controls the access of other roles to that Organizer. This role can be assigned to multiple users, in which case each user will only see the items they have created and the items that have been shared with them. For example, a project manager will only see "his" created projects and possibly projects assigned to his role.
- A role that has access set to "update" and has the checkbox checked will only see the items assigned to its role or items that the role itself has created.
- Users without this setting have access to all items in the level that is set for them.
- Example role settings for a project manager (inserts projects and sets permissions for other users) and for an assistant (only has access to assigned projects at the "read" level).
Setting user access to categories
The system allows you to restrict access to only certain categories. You do not always want to allow all categories for a role. Not all the items you need to record are for all your co-workers. You can restrict access to categories of items in the settings (more about categories here).
For example, in Assets Organizer, you can have items categorized as cars, computers, and phones. This way, you can show only cars in the Asset Organizer to the user role "HR", for example, so that he/she can track who is currently using which car. However, for example, the vehicle's technical data or its purchase price is no longer visible to the HR person. How to restrict access to only certain item details is explained in the following section.
Setting access to item information (what information the user will see)
Individual items (records) in the Organizer have a certain set of information (details, fields). Not all information is intended for all co-workers (for example, you want to protect personal information, salary amount, or business information such as price, etc.). So that you don't have to set up each field individually, access to individual details is configurable at the level of entire detail groups (more about detail groups here).
So the setup does not go through individual details; that would be too laborious but through whole detail groups. The details we want to restrict access to therefore need to be grouped in "detail groups".
Limit permissions to see all items
Normally, all users can see all items in a given Organizer (for example, all orders). If you want to prevent users from seeing each other's items - for example, so that each sales representative can only see his own orders - you use the special permission "Restrict access to all items". If a role has this permission set, then all users can only see the items that this role has created.
So if we have a role created, for example, Sales North America, all users with that role will see the same orders for North America. So the items are shared across all users with that role. If you would like each user to see only their own items, then you must create each user their own role.
Data export
Information from the Organizers can also be exported to Excel. By default, this option is not allowed for the role for data protection reasons (so that it is not easy to export data from the Organizers).
If you want your employee to be able to export data from Organizers, check "Allow export of data" for the Organizer. By checking this, he/she will see an icon with the option to export the data to xlsx format. The user will then see the Export Icon at the bottom of the Organizer explorer.
How to edit the permissions
You can edit the permissions of user roles at any time. Like creating a role, editing a role is available under the "Roles" option in the "Administration" menu accessible from the Aptien top bar. Here you select the role you want to edit and redefine permissions in the same way as when you created the role. Save.
How to delete a user role
Click on the three dots icon in the right-hand corner to expand the menu and click on "Delete Role". This process is irreversible.

